MebuLink Smart Switch Complete Installation Guide
Transform Your Sri Lankan Home with WiFi-Enabled Smart Lighting Control
📋 Table of Contents
🔧 How Smart Switch Works: Understanding the Technology
Before diving into installation, let’s understand how smart switches work. Smart switches replace traditional wall switches to provide WiFi-enabled lighting control. Unlike regular switches that simply break the electrical circuit, smart switches maintain a small current flow to power their internal WiFi chip and touch controls.
MebuLink Smart Switch Technology
The MebuLink Smart Switch uses advanced microcontroller technology to:
- Control lighting through touch interface or mobile app
- Maintain WiFi connectivity for remote control
- Support voice commands via Alexa and Google Assistant
- Enable scheduling and automation features
- Monitor energy usage for cost savings
⭐ Why Choose MebuLink Smart Switch for Your Sri Lankan Home?
The MebuLink Smart Switch is specifically designed to meet the electrical requirements and home automation needs of Sri Lankan households. With 240V compatibility, robust WiFi connectivity, and support for both neutral and no-neutral installations, it’s the best smart switch brand for modernizing your home’s lighting system.
🔌 240V Compatibility
Works perfectly with Sri Lanka’s standard electrical system
🏠 No-Neutral Support
Essential for older homes without neutral wires
📡 Local WiFi Support
Compatible with SLT, Dialog, and Mobitel networks
🛠️ Local Support
Sri Lankan customer service and warranty
📦 What’s Included in Your MebuLink Smart Switch Package
- MebuLink Smart Switch (1CH, 2CH, 3CH, or 4CH variant)
- Installation manual in English
- Mounting screws and wire nuts
- Capacitor for no-neutral installations (when required)
⚡ Pre-Installation Requirements
Safety First – CRITICAL
Before beginning any electrical work, ensure your safety by following these critical steps:
- Turn OFF the main circuit breaker at your electrical panel
- Test the switch with a voltage tester to confirm no power is present
- If you’re not comfortable with electrical work, hire a certified electrician
- Follow Sri Lankan electrical safety standards (SLSI guidelines)
Technical Requirements
| Specification | Requirement |
|---|---|
| Power Supply | 240V AC, 50Hz (Standard Sri Lankan electrical supply) |
| WiFi Network | 2.4GHz WiFi network with internet access |
| Mobile Device | Android 6.0+ or iOS 10.0+ smartphone |
| Load Rating | Maximum 10A per channel (2400W total) |
🔍 Identifying Your Wiring Configuration
CRITICAL Step
Before installation, you must identify whether your home has neutral wires available at the switch location. This is essential for proper installation.
Check for Neutral Wire Availability
Sri Lankan homes built in different eras have different wiring configurations:
- Newer Homes: Usually have neutral wires at switch locations
- Older Homes: Often lack neutral wires at switches
- Renovated homes: May vary depending on renovation scope
How to Check for Neutral Wire:
- Turn OFF power at the main breaker
- Remove the existing switch plate and switch
- Look for a blue wire (or group of blue wires) in the switch box
- If no blue wire is present, you have a “no-neutral” configuration
✅ Installation Method 1: With Neutral Wire
Step 1: Remove Your Existing Switch
- Confirm power is OFF using a voltage tester
- Unscrew the switch plate from the wall
- Carefully pull the switch out of the wall box
- Take a photo of the existing wiring configuration for reference
- Disconnect the wires from the old switch terminals
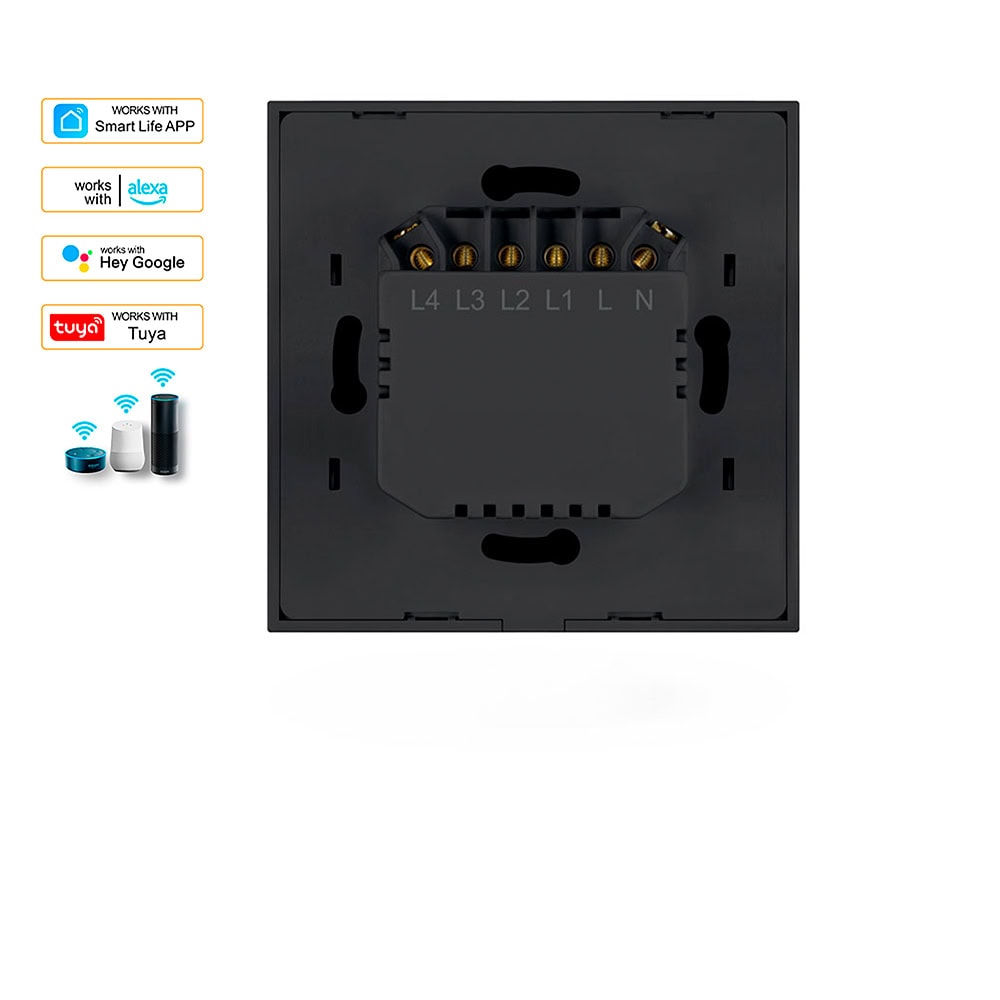
Step 2: Wire Configuration with Neutral
Standard wiring with neutral wire present:
- Live Wire (L): Brown or Red wire from the electrical panel → Connect to “L” terminal
- Switched Live (L1): Wire going to the light fixture → Connect to “L1” terminal
- Neutral Wire (N): Blue wire → Connect to “N” terminal
- Earth Wire (E): Green/Yellow wire → Connect to earth terminal
Step 3: Install and Test
- Carefully tuck wires into the wall box
- Secure the switch with provided screws
- Turn power back ON
- Switch should power up with LED indicators
- Test manual operation
🏠 Installation Method 2: Without Neutral Wire (No-Neutral)
Most Common Scenario
This is the most common scenario in older Sri Lankan homes. Follow these steps carefully.
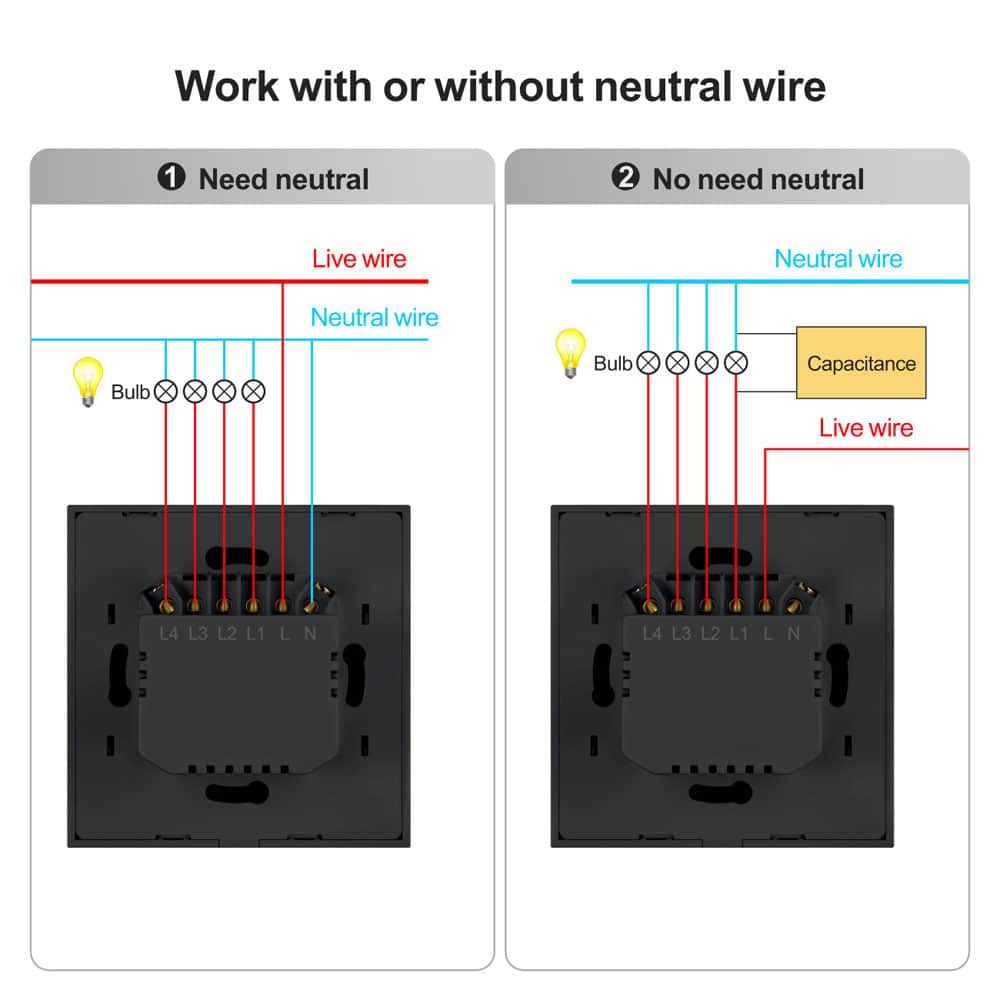
Understanding No-Neutral Installation
When there’s no neutral wire at the switch location:
- The smart switch gets power through the light fixture
- A small current flows through the LED bulb to power the switch
- A capacitor may be required to prevent LED flickering
Step 1: Verify Load Compatibility
Before proceeding with no-neutral installation:
- Also Compatible: Incandescent and halogen bulbs (up to 300W per gang)
- Not Compatible: CFL bulbs and fluorescent lamps
- Minimum Load: At least 3W per gang (critical for proper operation)
- Maximum Load: Up to 100W LED or 300W incandescent/halogen per gang
Step 2: No-Neutral Wiring Configuration (4-Gang Switch)
Wire connections for no-neutral installation:
- Live Wire (L): Brown or Red wire from electrical panel → Connect to “L” terminal
- Switched Live (L1): Wire going to Gang 1 light fixture → Connect to “L1” terminal
- Switched Live (L2): Wire going to Gang 2 light fixture → Connect to “L2” terminal
- Switched Live (L3): Wire going to Gang 3 light fixture → Connect to “L3” terminal
- Switched Live (L4): Wire going to Gang 4 light fixture → Connect to “L4” terminal
- No Neutral Connection: Leave “N” terminal empty
- Earth Wire (E): Green/Yellow wire → Connect to earth terminal
Step 3: Installing the Anti-Flicker Capacitor
CRITICAL STEP
If your LED bulbs flicker when the switch is OFF, you must install the provided capacitor. Note: Some modern Tuya switches may not require external capacitors.
Capacitor Installation Options:
Option 1 – At Light Fixture (Recommended):
- Turn OFF power at the main breaker
- Remove the light fixture or access the ceiling rose
- Locate the neutral wire (blue) and switched live wire (coming from switch)
- Connect the capacitor between neutral and switched live wires for each gang that flickers
- Secure connections with wire nuts
- Reinstall the light fixture
Option 2 – Behind the Switch (Alternative):
- If a neutral wire bundle is present in the switch box but not connected
- Connect capacitor between the L1 terminal and neutral wire bundle
- Secure all connections properly
Step 4: Testing No-Neutral Installation
- Restore power at the main breaker
- Check that LED bulbs light up properly when switch is ON
- Verify no flickering occurs when switch is OFF
- Test touch controls on the smart switch
- If flickering persists, check capacitor connections
🔧 Troubleshooting No-Neutral Issues
💡 LED Bulbs Flickering When Switch is OFF
Cause: Small current leakage through LED bulbs
Solution: Install the provided capacitor as described above
🔌 Smart Switch Not Powering On
Check Load: Ensure minimum 10W LED load per channel
Verify Wiring: Confirm L and L1 connections are correct
📶 No WiFi Connectivity
Power Stability: No-neutral installations may have power fluctuations
Solution: Add more LED load or install capacitor to stabilize power
📱 WiFi Setup and App Configuration
Step 1: Download the Smart Life App
The MebuLink Smart Switch is compatible with multiple apps for maximum flexibility:
- Smart Life: Primary app for MebuLink devices
- Tuya Smart: Alternative app with identical functionality
- Download from Google Play Store or Apple App Store
Step 2: Add Your Smart Switch to the App
- Open the Smart Life app and create an account
- Tap the “+” icon to add a new device
- Select “Switch” from the device categories
- Enter your WiFi network credentials (2.4GHz network only)
- Put the switch in pairing mode by pressing and holding any button for 5 seconds
- LED will start blinking rapidly indicating pairing mode
- Follow the app instructions to complete the pairing process
Common WiFi Setup Issues in Sri Lanka
If you encounter connectivity issues, try these solutions:
- Weak Signal: Ensure your router is within 10-15 meters of the switch
- 5GHz Network: Switch to 2.4GHz network (common issue with SLT Fiber routers)
- Network Congestion: Restart your router and try during off-peak hours
- ISP Restrictions: Contact your ISP (SLT, Dialog, Mobitel) if connectivity persists
🚀 Advanced Features and Configuration
Voice Control Setup
Amazon Alexa Integration:
- Open Alexa app and go to Skills & Games
- Search for “Smart Life” skill and enable it
- Link your Smart Life account
- Discover devices and assign room names
- Test with voice commands: “Alexa, turn on bedroom lights”
Creating Automation Schedules
CEB Load Shedding Preparation:
- Set lights to turn off automatically during announced power cuts
- Create “Power Resume” scenes to restore lighting after outages
- Schedule energy-saving modes during peak tariff hours
💡 Energy Efficiency Benefits for Sri Lankan Homes
Smart switches offer significant energy savings, particularly important given rising electricity costs in Sri Lanka:
CEB Tariff Optimization
⏰ Peak Hour Management
Automatic dimming during expensive peak hours (6:30-10:30 PM)
🌙 Off-Peak Maximization
Schedule high-usage activities during cheaper off-peak periods
🔧 Important Installation Tips for Sri Lankan Homes
Common Wiring Colors in Sri Lanka
| Wire Type | Color | Notes |
|---|---|---|
| Live (Hot) | Red, Brown, or sometimes Black | From electrical panel |
| Neutral | Blue | May not be present at switch |
| Earth (Ground) | Green/Yellow striped or Green | Safety wire |
| Switched Live | Often same color as live wire | Goes to light fixture |
🛡️ Warranty and Support
Your MebuLink Smart Switch comes with comprehensive support:
📅 Warranty Period
6 months local warranty
🇱🇰 Local Support
Sri Lankan customer service team